Friday, January 25, 2013

I Don't Do Cute

A heading in today's newspaper caught my eye...."Cute costume jewelry could please your Valentine".
Cute? 
Ugh....I don't do cute.
At least, from my perspective, I don't do cute.
As I continue to develop my design aesthetic, I find that I am usually drawn to grittiness...the roughly textured.
Where some might see flaws, I often see a beautiful truthfulness.
This is one of the cuffs that I finished last night.
I let the heat from repeated annealings determine the color, and I aggressively pounded the surface with chisels, dapping punches, screwdrivers....anything that I thought would add an interesting texture. 
With some of my pieces, especially the fold formed cuffs, I'm looking for the beauty that can be revealed in unexpected places.
 

Monday, January 21, 2013

Making a Better Gingko Leaf

The title of this post should really be 'Making My Gingko Leaf Better' since Gingko biloba is wonderfully perfect.
The Gingko trees that are planted in our communities are basically the same as those that existed 200 million year ago, evidenced by fossils.
Gingko is used to treat a variety of ailments from senility, asthma and allergies, tinnitus and fibromyalgia.
The fruit are extremely odoriferous, earning the plant the dubious title of 'Nature's Stinkbomb'.
A bag of those stinky fruit played a crucial role in the 'Night of Clalmities' when there was a collective meltdown amongst the undergrad students in the Landscape Architecture Department at the University of Illinois back when I was in the graduate program.
But that's another story....back to my leaves.
A request for leaves was made by the Manager of one of the shops that carries my work.
He mentioned that he really likes Gingko leaves, and I immediately said, "No problem!"
I had never made any Gingko leaf jewelry, but knew that this was something that I could easily undertake.
This is the first leaf that I made with 18 gauge brass.
I chose to work with brass, making a connection between the color of the metal and the bright, yellow fall color of the leaves.

Once I decided that the size and shape were what I wanted, I made templates out of cardstock, cut them out and fastened them to my sheet of 18 gauge brass using spray adhesive.
I used my jeweler's saw to hand cut the shapes which were then filed, sanded and textured with an old flea-market-find chisel.
My first leaf made me rethink part of my design.
As I made that first leaf, I didn't really give much thought about how it would hang on a chain.
I pretty much worked on auto-pilot, figuring that I would drill a hole for a wire wrapped connection.
Auto-pilot will get you to a good place, but there's usually another choice.
I do like the way the wire wrapped leaf will be able to "flutter" when on a chain, but I thought that it might also be interesting to have a cleaner look.
When I cut out the next few leaves, I made the leaf stems longer and then shaped them with my bail-forming pliers.
Most of my necklaces have wire wrapped chains with pearls and semi-precious stones, but this time, simplicity seemed the way to go.
I cut a choker length piece of leather cording and strung it through the bail.
Almost done......but I now had to figure out how to finish off the ends of the cording.
I do have fold-over crimp ends which were purchased from one of the supply companies that I frequently order from.
These are great findings, but this was not working for me.
I decided that I needed to make my own findings.
Using a nail as my form, I wrapped tight coils of dark annealed steel wire.
After inserting the cording, the one end of the coil was crimped, keeping my connections secure.
With the same wire, I made a clasp.
Much better than the manufactured crimps.

Sunday, January 20, 2013

Family History Gifts

As my siblings and I prepared to sell our family home early last year, we had to clear out more than half a century of family history.
That's a lot of stuff.....at least for my family it was a lot of stuff.
Being a sucker for old photos and documents, I had to stop and examine these items trying to understand their relevance.
I know that I can't turn my home into an archive of the past, so I resolved to ignore the temptation I felt to keep much of the old paperwork from various relatives.
I did not however ignore that voice inside me that said, "Hmmmm.....I think I could do something with this."
A very limited amount of the old paperwork did come home with me,
 and I did do something with it.
I decided to make Christmas gifts for my siblings using these pieces of the past.
Using property tax documents, bank statements, a cancelled check and a page from an old dictionary, I made a base to be used for 9 x 12 canvases.
I didn't want to recreate each base, so I made color copies on the self serve copiers at a local office supply store.
I also made regular black and white copies of photos from our parent's wedding as well as a photo of our home.
I turned the wedding photocopies into transparencies and everything was assembled on 9 x 12 canvases that I had prepared with a black primer.  
A glossy gel medium was used to protect the surface.
I've always loved making homemade gifts!

Wednesday, January 9, 2013

Still Trying To Stay Afloat

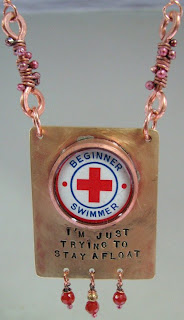
A few years ago, one of my thrift store searches yielded a collection of vintage pins/buttons including an old Red Cross pin that was given out to those who successfully completed the beginners swimming class.  Like many of my finds, I initially had no idea how I might use the pin, but I appreciated the boldness of the graphics and tucked it away, waiting for the right inspiration to reveal itself.
With the recession of 2008 came the right inspiration.
Prices at the grocery store were rising, my retirement account was shrinking, preparation for college bills was looming.....I felt like I was suffocating with fear.
I felt like I was sinking.
Bingo!  
There was my inspiration!
That angst manifested itself in a pendant stamped with
'I'M JUST TRYING TO STAY AFLOAT'
The necklace that I made was included in my inventory for that year's holiday show at the Community Arts Center in Wallingford.
As I worked one of my shifts during the show, I saw a man casually glance at my work as he walked past my display.
He stopped when he noticed this necklace, took it from the display to study it, then put it back and walked away.
It was so interesting to watch him come back several times to look at and hold the necklace.
On his 4th or 5th return, he took the necklace and purchased it.
I felt satisfied thinking that this necklace that had special meaning for me had also connected with this man and would hopefully resonate with the intended recipient.
I decided that I needed to find more of these Red Cross pins....easier said than done.
Thrift store searches.....no luck.
Internet searches.....found some, but always too expensive.
 
Then, a lovely thing happened.
 
A friend who was aware of my search had found a collection of the Beginner Swimmer pins online, purchased them, and sent most of them to me.
She also makes jewelry and kept some of the pins to make her own, inspired interpretations which I look forward to seeing.

I got to work making a new and improved version of my original necklace.
I used a similar bezel that was cut from an old copper pipe and soldered onto a brass base.
Riveted to the bottom of the brass base is a segment of my old tissue box holder that continues to come in handy.
Wanting more textural interest than my original version, I chose to stamp the staying afloat sentiment onto a piece of German silver which was also riveted to the brass base.
Using the bold colors of the Red Cross pin for inspiration, I wire wrapped a chain with carnelian, vintage red glass beads that were rescued from an old necklace, honey jade and another creamy colored bead of uncertain origin.
Tiny carnelian beads were also wire wrapped and dangle from the bottom of the pendant.
The necklace was finished with a handmade clasp made from recycled copper wire.

Monday, January 7, 2013

Turning Over a New Leaf

Last week, I met with the Manager of the Woodmere Art Museum Gift Store and we made plans for the inventory that I'll supply in preparation for Spring.
Yes, only a few weeks into Winter and it's time to get ready for Spring.
There was an interest in my fold formed leaf pendants, but the fact that they don't lay flat was an issue.
No problem.....I said that I would make other, flat-laying leaf pendants that could be considered when I return with new inventory.
I already had some milled copper leaves and got to work turning them into finished pendants.
Dried leaves had been rolled in my mill with sheets of annealed copper.
To give this pendant necessary substance, I saw cut a larger base of heavier gauge brass, texturing the edges with a ball peen hammer.
The two layers were riveted together with balled copper wire.
Because I generally like to have something interesting on both sides of my pendants, I stamped a message on the back side of the brass base before riveting the pieces together.

'LIKE THE TREES I HAVE LEARNED TO BEND IN THE STORM'

Maybe I should also learn how to better control my riveting hammer.