Sunday, December 25, 2011

Another Wonderful Christmas Gift

A couple of years ago, my one son gave me a wonderful gift- 'The Santa Stimulus Package', an original comic that he wrote and illustrated.
This year, he gave me another original creation:

'How the Legal System Stole Christmas'
by H. Dahmm

Chapter 1

Although he lived in a region where temperatures never reached above freezing, Santa had never felt this cold in all his life. He waddled wearily around the small enclosure, surveying its modest furniture. Against the far wall sat an industrial steel bedframe, which held a deplorably thin mattress that could never support his weight. In the opposite corner, there was a metallic toilet, which was caked in rust. Outside the room’s one window, snow was falling. Between the snow and Santa, though, stood a series of vertical, iron bars.

As inconceivable as it seemed, The United States government had placed Santa on their “naughty” list and had locked him in a penitentiary accordingly. The evening had begun as all Christmas eve nights had begun before. Along with a warm hug, Mrs. Claus had given Santa a thermos of hot cocoa and a laxative (all of the cookies had to go somewhere) and then sent him on his way. Following a salute to his faithful elves, Santa boarded a super jet laden with toys.

Although much of the general public was under the impression that Santa preferred to travel by Reindeer, he had found this mode of transportation to be rather problematic. After Rudolf had experienced an unfortunate run-in with an electric cable, Santa had made the executive decision to transition over to a more conventional form of flight. The plane was secured by armored walls and some twenty chubby elves armed with high powered rifles, which they could barely lift, let alone fire. These safety measures seemed absurd, but the aircraft’s cargo was enough to fill 58 Wal-Marts.

When the jet reached the eastern coast of the United States, Santa and his elves, one by one, began to parachute from the rear of the plane. With packaged gifts in their arms, they gradually descended through the cloudy night, landing on the roofs of nearby houses. The impact with asphalt shingles was unpleasant, and muttered curses of “wrap it!” and “oh gingerbread!” filled the air. Once at their assigned destinations, Santa and his elves tossed some presents under the Christmas tree, took the liberty of “examining” the refrigerator, and made a pit stop by the bathroom. Additionally, Santa snapped a few photographs at every house he visited. These images were intended for his decidedly disturbing blog, titled “I See You When You’re Sleeping”.

As soon as this work was done, Santa and his elves climbed their respective chimneys and loaded onto the hovering jet by launching candy cane grappling hooks that connected with the underbelly of the airplane. Once they had all returned to the ship, the elves, and especially Santa, celebrated a successful round of deliveries with a healthy serving of spiked eggnog.

This process was then repeated hundreds of thousands of times across the country. By the time the team reached California, mistakes began to arise. Due to exhaustion, Santa would on occasion give a young boy a doll house or a ten year old a collection of Spot books, but this night he had made an error of unprecedented magnitude…

What was Santa’s big mistake? What has NORAD really been up to all these years? Is Santa a jolly fat man or a predator?

Find the answers in the next edition of

'How the Legal System Stole Christmas'

I can't wait for Chapter 2!

Saturday, December 24, 2011

Holiday

Happy Holidays!
Best wishes for a creative New Year!

Wednesday, December 21, 2011

A Real Page Turner

In recent years I have become a huge fan of audio books. When I get in my car, I usually have a book to listen to. I'll have one book going for driving and one book going for studio time. There are few and precious moments when I can actually sit to read a book, but when I do, I definitely prefer an actual book.
I have yet to be tempted by the various forms of e-readers.
I love having the actual printed text in my hands and the actual book on one of my bookshelves.
So old fashioned of me!
Appealing to those other old fashioned readers, I recently made some bookmarks.
These sweet bookmarks have bits of text that I cut out of one of my old, old dictionaries.
The text was then protected with a two part epoxy resin.
I am completely delighted with these bookmarks which came about when a friend asked, "Say, do you make bookmarks?"
I thought of the cardstock bookmarks that our local library gives out, and used that size as inspiration for my design.
Pieces of copper, brass and German silver were cut, filed and sanded. I then textured the surfaces with various hammers and steel stamps.
A selection of quotes were hand stamped onto small pieces of brass which were then riveted to the bases.
A hole was cut in to top of each bookmark for threading a piece of leather.
Bookmarking an e-reader is simply not as fun as having an actual bookmark.

Monday, December 19, 2011

Other Interests

For years I had thought about trying my hand at painting, but always had a reason not to follow though....too busy with an abundance of commitments and a deep seeded fear that I would really stink.
Earlier this year I thought "What am I waiting for?"


It is quite a struggle for me, but working in the 2 dimensional arena does not scare me as much as it used to.

Wednesday, November 30, 2011

Made in America

For those of you interested in making purchases of 'Made in America' products, there are some wonderful venues in the Philadelphia area that might be of interest.
I am shamelessly promoting the following selection because, along with a collection of other artists and craftspeople, these shops and shows feature my jewelry.

Woodmere Art Museum Gift Gallery
Located in Chestnut Hill, the wonderful Woodmere Gift Shop expands into one of the galleries to display a wide variety of unique, handcrafted gifts, featuring local talent. The gift gallery is open through the end of the year.

Sweet Mabel is located in Narberth, PA.
This small shop is a treasure trove of delightfully quirky one-of-a-kind items with a focus on American folk art. Tracy, the always smiling owner, works hard to find new artists which keeps the displays fresh and captivating.

The juried Holiday Sale at The Community Arts Center in Wallingford, PA really is one of the best ever!
Artists from eastern Pennsylvania and selected surrounding states will be selling their original creations in the beautiful Duke Gallery.
Yes, that's my bracelet in the top right corner of the promo image.

The Main Line Art Center in Haverford, PA begins this Friday and continues through December 11.
This juried show also features artists and craftspeople form the Philadelphia/east Pennsylvania region. I set my display up today and was wide eyed as I looked at the fabulous displays that were already in place.

Buying products at any of these shops/sales will satisfy any 'Made in America' urge that you might have.
It will also satisfy that 'Support those Starving Artists' urge.

Friday, November 18, 2011

A Thanksgiving Tale


Years ago, as I prepared to graduate from Cook College of Rutgers University with a degree in Landscape Architecture, I was trying to figure out where I was going and what I would be doing. I had several job offers that were being considered, but none of them were leaping out as the obvious and exciting path that I absolutely had to explore. The exciting opportunity came when the head of our department asked me, along with Ed (another graduating senior), to meet in his office.
 
The Chair of the Landscape Architecture Department at the University of Illinois had called, asking if there might possibly be two students who would consider entering their graduate program. The list of incoming graduate students did not have the right candidates to fill 2 teaching assistant positions, and they did have a special fondness for Rutgers graduates. Our Chair said, "I think I have 2 perfect seniors for you." And that's how both Ed and I ended up at the University of Illinois in Urbana-Champaign. I was the Teaching Assistant for the Site Technology classes and Ed was assigned to one of the Introductory Design classes. Full tuition and a salary made this decision easy to make.
 

During our undergraduate years, Ed and I were always friendly but were not really friends. Ed was way more cool than me- not a hard thing to accomplish since I would not even register on the 'Scale of Coolness'. He had his circle of friends and I had mine and we comfortably coexisted in the same program. When we both moved out to Urbana-Champaign, our amiable friendliness continued as we again found friends in different circles. We would often be at the same event or party, but we did not have the kind of friendship that included calling each other to chat or to make social plans.
 
That is one of the reasons I was surprised when my phone rang early on Thanksgiving morning of our first year in graduate school, and it was Ed. Being a desperately poor graduate student, I was in town since I couldn't afford to go back to New Jersey for the holiday weekend. I don't recall if I had any plans for the day, but I do know that I would not have planned on calling Ed to wish him a Happy Thanksgiving, nor was I expecting that he would call me. But there I was, wakened on Thanksgiving morning by a phone call from Ed thinking, "This is weird."
 
Ed needed a favor. He was going back to New Jersey for the holiday and needed help getting to the airport. Ed owned a car and I didn't....how exactly could I be of help? He explained that he couldn't afford to leave his car parked at the airport and wanted to know if I could drive him to the airport and then drive his car back to the campus area. The Willard Airport that serves the University of Illinois is just south of campus; why not take the shuttle bus? Ed was not flying out of Willard, right down the road. Oh no....he was scheduled to fly out of Indianapolis International Airport, as in Indiana, where he had found a ticket price that he could afford.
 
Ed had had a brilliant plan. He woke up early and carried his travel bag along with his "INDIANAPOLIS AIRPORT" handmade sign to interstate 74. He figured he would have no trouble hitchhiking to the airport and be there in time for his flight. He clearly figured wrong. He stood along the highway long enough to realize that if he didn't enact Plan B, he would probably miss his flight. 
 
I was Plan B. 
 
I told Ed there were some problems with this plan including the fact that I didn't know I was Plan B and that if I dropped him off at the airport, that meant I was in Indiana. He said there was a bonus for me....the use of his car while he was away. Not quite a bonus. Ed had an old Ford Capri, and...sorry Ed, but those of us who knew the car referred to it as The Crappy. In addition, although I was in grad school, I had hardly ever driven. At that point in my life, I had never owned a car. My mode of transportation was either foot or bike. I wasn't too excited about the idea of driving The Crappy anywhere. But I was even less excited about saying no to Ed who desperately wanted to make it to his parent's house in time for the evening meal.
 
I was more than a bit irritated when I told Ed to come pick me up, and we began our journey to the Indianapolis International Airport. After almost 2 1/2 hours of driving, we pulled up at the terminal in time for Ed's flight and I turned around to make my 2 1/2 hour trip back to my Urbana apartment. Driving The Crappy seemed fitting for the Thanksgiving that I was having.
 

There are a couple of lessons from my Thanksgiving tale. Make sure that you are always on good terms with a few completely uncool people. When problems arise, they may be the only ones available to help you out since they will have no other plans. Also, when turning your car over to someone who has hardly ever driven, make sure to let them know that you have engaged the parking brake so that they don't drive 2 1/2 hours wondering what that funny smell is.

Tuesday, November 15, 2011

Poppies Part II

And a few days later....
the poppies are becoming sweet necklaces.
Sterling chain with a sterling clasp and jump ring.

Saturday, November 12, 2011

Yes, I Make the Components

Earlier this year, I took part in a one day street fair that was a juried 'Fine Art & Craft' show. I don't typically do this type of show, and I enjoyed meeting the other artists/craftspeople and those people who pause at my booth. Most people are very friendly, and I appreciate the feedback that I get on both my jewelry and display.
You may notice that I used the word 'most'.
One gentleman was coerced into stopping at my booth because his wife wanted to look at my display. She clearly wanted some of my earrings, and I had the impression that the husband clearly did not want her to make a purchase.
He looked at me and said, "You made all this stuff?!"
I explained that yes, I had made everything and that everyone in the show had made all of their 'stuff'. That's kind of what these juried shows are all about.
He then pointed at one pair of earrings and said with more that just a little bit of dismissive aggressiveness, "How long did it take you to make those?"
His tone suggested that he didn't think my effort was worth the whopping $37.00 that I was charging.
I explained that it was difficult to know how long it takes to make a particular piece since I make the components in batches before I can start assembling any finished piece.
He looked at me as if I were telling him an egregious lie and said, "You make the components?!"
"Yes, I make the components."
I was thinking I could explain the process, but I didn't feel like engaging him in further conversation. Plus, I know that he wasn't interested in understanding my process; he was interested in making sure that his wife didn't spend any money at my booth.

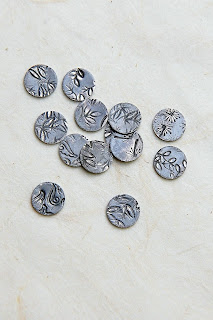
My process for one type of component:
I cut discs from a piece of sheet metal.
All edges are sanded smooth.
The discs are then annealed, making the metal softer and darkened from the oxidation that occurs when exposed to the heat of the acetylene torch.
Stamps were selected for texturing.
Using the stamps, textures were hammered onto one side of each disc.
The discs were sanded to clean up some of the oxidized finish, better revealing the stamped textures and holes were punched in some of the discs.
Some had another disc cut out.
Those tiny cut out discs were sanded along the edges
and then drilled and domed.
After completing those steps, I had components ready so that I could design and assemble a selection of earrings.
So....yes, sir.
My jewelry is hand made and I do make the components.

Wednesday, November 9, 2011

Poppies......Poppies...

Still in a dash to make items for the upcoming holiday sales, I spent last night making my interpretation of metal poppies.
I began by cutting two sizes of copper discs. Using my half round hand file, I created an uneven texture along the circumference of each disc, followed by a thorough sanding to smooth the surfaces.
Addition texture was added with one of my favorite tools- an old chisel that I found at a flea market. I always pause at the flea market booths where lots of tools are laid out on tarps. These booths are almost exclusively run by grandfatherly gentlemen who are usually amused to see a female take interest in their old, rusty items.
Some of them will ask me what I'm planning to do with my purchase, and when I explain that I'll use it to make jewelry, they almost always say, "Huh?!....." and turn away.
I don't think that many of these men are at all interested in discussing creative pursuits.
Once I used the chisel to texture the edges, the discs were domed, and holes were drilled.
Small segments of sterling wire were torched to make tiny balls and the three parts were then soldered together using paste solder.
After a cleaning in the pickle, the poppies were treated with liver of sulfur. Highlights were brought out with a fine grit sanding block.

Thursday, October 27, 2011

Instant Patina

My supply of liver of sulphur came in handy once again as I worked on some necklaces for my Woodmere Art Museum order.
Liver of sulphur is a mixture of potassium oxides and is used to create an instant patina on sterling silver and copper.
I have had the same can of liver of sulphur for years and take care to keep it sealed. If your supply gets wet, it becomes 'deactivated' and will not yield good results.
A small chip of liver of sulphur was added to a container of warm water, and once the chip dissolved, I added my newly finished briolette necklaces made with sterling, pearls and semi-precious gemstone briolettes.
The necklace on the left shows how the necklaces looked after being submerged for approximately one minute.
While I do like this darkened gunmetal patina for some pieces, I wanted something a bit brighter and reflective for these necklaces. All surfaces of the sterling chain, rings, wire and clasp were lightly sanded with a foam sanding block to selectively remove areas of the dark patina.
The necklace on the right is now completed after 15 minutes of careful sanding.
Many jewelers use sanding sticks or hand held pieces of sand paper, but I prefer to use foam sanding blocks. The block is much easier to grasp than a piece of sand paper, and I like how the foam can compress slightly making it easier to make contact with different surface of a completed piece.
I purchase my sanding blocks at hardware stores and always get the finest grit that is available.

Wednesday, October 26, 2011

Getting Ready

I have been so busy in my studio, getting ready for the upcoming holiday season.
I'm working on an order for Woodmere Art Museum in Chestnut Hill where a wonderful, expanded gift shop is set up in one of the galleries for the months of November and December.
I am also getting ready for the upcoming juried shows at Main Line Art Center in Haverford and Community Arts Center in Wallingford.
I'm going to need lots of inventory to cover three venues at the same time, so I'm busy, busy, busy!
Last night's efforts included corrugating annealed copper strips which will be riveted onto some of my etched bangles, etched silver nickel sheets and soldered sterling wire hoops.
I thought that the sterling hoops would be a quick, simple task, but....they were such a pain!
I used paste solder and a small torch, and took great care to make sure that the end of my wire met flush. In spite of my prep work, the heat of the torch deformed the rings ever so slightly. That ever so slightly amount of deforming was enough to create a teeny gap where I previously had a flush connection.
Anyone who has done soldering knows what that means....failure!
Arrrrrggghhh!
After a few attempts, I did get the solder to flow where I wanted it to flow, but only on around half of the rings. Something to work on.
More etching was done on brass bangles. These have had only the initial cleaning with a brass wire brush after being submerged in a baking soda bath. Filing and sanding will complete the cleaning before I start adding riveted layers.

Thursday, September 29, 2011

New Supplies

Rings & Things was in town this week for their one day bead show. I looked forward to this show since I completely avoided purchasing beads when attending Bead Fest in August.
I'm planning on incorporating some of these beads into my Longfellow Necklaces, especially the Keshi pearls.
The African jasper (that resembles turquoise) will probably be paired with the orange African trade beads.
My favorites are the faceted aquamarine rondelles that are at the top and the faceted pink quartz teardrops. They have so many tiny facets that they appear to shimmer when light hits them. They are so beautiful that I just might have a hard time using them.

Friday, September 23, 2011

New Bangles

Yesterday's efforts yielded some new bangles.
Last year, I had etched some bangles but was frustrated with uncertainty. I knew that the bangles needed 'more', but I didn't know what that 'more' should be.
I think I found it.
I was experimenting with a corrugator and loved the texture that I was able to get on pieces of annealed copper. I knew that my bangles needed more texture and realized this could be a happy marriage of materials.
Using the metal guillotine, I cut the corrugated copper into strips which were then cut to appropriate lengths and rivet set onto my bangles.
Sometimes it takes a while to find the right inspiration, and sometimes it's worth the wait.

Tuesday, September 20, 2011

Longfellow Pendants

Earlier this year, I used the words of Henry Wadsworth Longfellow to make a pendant that was the focus of a long, wire wrapped necklace.
I decided to go back to my stash of lovely brass utensils and my old book, 'Voices of the Night and Other Poems' written by Longfellow and published by Hurst & Co. in 1898.
Yes, I cut up old books....ones that tattered and of little value from a collector's point of view.
I used my jeweler's saw to cut off the bottom potion of the utensils. I removed the pieces of caramel-swirl bakelite that were broken and saw cut the rivets, making them flush with the underlying brass. Cut edges were filed and sanded smooth.
I searched through my Longfellow book, looking for phrases that would be able to fit within the limited dimensions of my utensil pendants.
The poetic phrases will be sealed with a gel medium and then coated in a 2-part resin.
Then I'll be ready to make my collection of Longfellow necklaces.

Sunday, September 4, 2011

Spirituality

I recently overheard someone commenting on the decline in the number of people attending church. I am not aware of the relevant statistics, but I would suspect that there is truth in the comment. What I heard next in this unintentionally eavesdropped conversation continues to bother me- disdain for people who say that they are spiritual in spite of having no church affiliation.
The definition, in part, of spiritual in my Webster's dictionary: "of the spirit or the soul as distinguished from the body or material matters; of or concerned with the intellect; the ascendancy of the spirit showing much refinement of thought and feeling."
While my sons and I do belong to and attend a church in our community, I have always felt strongly that spirituality does not only exist within the confines of organized religion.
We are all surrounded by people who willingly give of their time, resources and talents to benefit a greater good, and many of those efforts are done independent of a church or religious sponsorship.
Those efforts speak to me of spirituality.
During my thrift store searches, I am always drawn to religious medals that physically represent the concept of spirituality. Some are worn in places making me wonder if the previous owner found comfort or strength when holding the medal.
I find a real comfort when incorporating one of these charms into a piece of jewelry.
I recently completed this necklace, 'My Only Recourse', inspired by a vintage Blessed Mary charm that I found at the local thrift store.
Inscribed around the edge of the charm is 'O Mary conceived without sin pray for us who have recourse to thee'.
The charm is attached to a sterling wire wrapped, faceted quartz crystal bead which dangles from a vintage piece of brass filigree.
The sterling chain is wire wrapped with pearls, amazonite, citrine and honey jade, and is finished with a clasp made with 16 gauge sterling wire.

Wednesday, August 24, 2011

New Jewelry Tools

I went to Beadfest last week expecting to purchase some tools as well as a nice variety of beads. There were so many people on the floor of the trade show, that I just chose not to go through inventory of gemstones while elbow-to-elbow with others. I think that years of working by myself in my basement studio has encouraged anti-social tendencies.
I chose to focus only on tools.
I have come to appreciate the value of buying the best tools that I can afford.
I bought my hammers from T. B. Hagstoz & Sons knowing that their inventory is typically among the best that is available. I'm exploring more metal forming, and these hammers will be especially useful for the foldforming that I'm experimenting with.
The brass brush and the Cupola Punch & Die set were purchased from Metalliferous. Pepe Tools, a leader in the jewelry tool business, made the Punch & Die set.
The flush cutters were purchased from Beaducation, and I love how they really do make a nice, flush cut on silver wire up to 12 gauge.
Quality tools will cost more than others, but they will last longer and will help you to efficiently and effectively develop your skills.

Thursday, August 18, 2011

Know Your Beads

I'm planning my schedule for tomorrow, looking forward to attending a large bead show where I expect to purchase both beads and tools. Over the years, I have cultivated a collection of suppliers from whom I will order via their catalogs or internet sites, but when it comes to beads, I definitely prefer to make my purchases in person.
I want to hold a string of beads in my hand to fully appreciate the color and texture and to explore various combinations that I might use in future pieces. I also appreciate being able to talk to vendors, confirming what the beads are and where they came from so that I can pass that information on to my customers.
I have learned that what I am told by some bead show vendors is not always accurate. When I have doubts, I do my own research to figure out what is what.
For instance, the above beads were purchased from a vendor who told me I was buying orange turquoise. I had my suspicions, but wanted the beads regardless of what they were. I did some internet sleuthing once I got home.
I determined that what I had bought was most likely howlite, a calcium borosilicate hydroxide that was first discovered in Nova Scotia. I don't necessarily think that the vendor was purposely trying to mislead me; he may have been repeating what he had been told.
I only know that I will tell my customers that I believe the beads are dyed howlite.
Orange turquoise or howlite.....they are beautiful beads.

Monday, August 8, 2011

Soldered Ring Part II

My recent ring project encountered some problems while I was soldering, but I was determined to try again, hoping for better results.
While the new ring is similar to my previous project, I tweaked the design.
I cut a longer piece of etched brass (different pattern) and shaped it to have a curve that mimics the ring shank.
A small brass square was again soldered to the etched brass, but I located it off-center.
When preparing to solder, I double and triple-checked the third-hand clamp to avoid any unfortunate shifting of materials. This time, everything stayed in place as the solder flowed....no melting of metals that were not supposed to melt.
After the ring was pickled and cleaned, I drilled a hole through the center of the brass window and used balled sterling wire to rivet set a small, faceted peridot bead.
Such a better outcome!

Saturday, August 6, 2011

Spiritual Charms

As a parent of 18 year old twins, it is so satisfying to have reached a point where conversations are often focused on issues of real substance, and I can find myself on the listening end of thoughtful observations and compelling arguments. My one son and I had an interesting discussion yesterday regarding religion and issues of spirituality. How fitting that today I found this collection of religious charms at the local thrift store.
These will soon be incorporated into long, wire-wrapped necklaces that I want to have for my upcoming show.

Saturday, July 30, 2011

Special Projects

A nice aspect of having a studio of tools and supplies is that I can sometimes do special projects for family and friends. Around a year ago, I was able to make the bridal jewelry that my oldest niece wore for her wedding. Just yesterday, I handed back a bracelet that I had fixed for a friend. The anniversary gift from her husband had broken. An easy repair, and she was delighted to have her special gift back on her wrist.
Some of the projects are especially significant to me.
As my one son has lost more of his vision, some tasks, such as signing his name, have become extremely difficult.
Products designed for the visually impaired include a variety of signature guides. As I looked at the styles available, I thought that none of them had just the right features to be most suitable for my son.
Time to get to the workbench.I cut a piece of 16 gauge copper the size of a business card thinking that it could conveniently fit in my son's wallet. Using my jeweler's saw, I cut out two rectangles. In each rectangle, I saw cut short notches that an assistant could align on the signature line. My son can the feel the rivets to understand where his signature needs to be placed.
A hole was drilled in the upper left corner in case my son would rather put the signature guide on a key chain that would then be attached to his white cane.
The guide has already come in handy numerous times, and I know that my son appreciates knowing that it is a one-of-a-kind item.

Monday, July 25, 2011

Still Working on the Soldering

I really enjoy etching. It's so satisfying to have a piece of metal that nobody else has. My pieces of etched brass, silver nickel and copper are so wonderfully unique that I often have a hard time cutting them up for use in actual projects. I can be that way with a lovely piece of fabric. There is something magical about looking at a prized material while imagining the many possibilities of how that material could be transformed. I sometimes have to force myself to let go of that magical moment and.....use the material already!!!
Such was the case with this piece of brass that I etched with vintage images of a rooster.
This etching was done several months ago, and I have only recently begun to use it in some projects. Last week I cut a small piece to use in a ring design that I was envisioning.
I started out with a piece of sterling flat wire that was measured to fit my finger. The two ends were filed to meet flush for soldering. After soldering and pickling, I formed the piece on a ring mandrel using a high density plastic mallet. Whoops...could have gotten a better join. You can make out the solder seam at around 8 o'clock.
Oh well, by the time this project was done, that solder seam was the least of my worries!
Once I had the circle formed, I textured the surface with a ball peen hammer. Rings are subject to a lot of abuse, and a textured surface can hide many of the inevitable scratches.
I then took a small rectangle that I had cut from my rooster brass, filed the edges and corners smooth and soldered a small, square brass 'window' onto the surface.
I prepared for soldering my brass rectangle onto the sterling base by using a third-hand clamp which is especially useful when soldering something flat to something round.
Everything was going just great until it wasn't going great.
Right around the time that I expected the solder to flow, the clamp unexpectedly shifted, leaving my pieces out of alignment.
Oh no!! I lost my soldering mojo.
I ended up applying too much heat as I made a futile effort to realign my pieces, and my sterling started to melt. Ooooh....not a successful soldering job.
At least nobody sees the back of the ring!