Tuesday, July 24, 2012

My Metal History

My interest in working with metals began years before I developed an interest in making jewelry.
It began when I was a landscape architect with Morgan Wheelock Incorporated in Boston.
I was fortunate to be involved in a wide variety of wonderful projects that typically included uniquely designed and fabricated elements.  In conjunction with the site plans, we often developed detailed drawings and specifications for railings, gate hardware and even drainage grates in order to capture the proper aesthetic for each project.
I always enjoyed coordinating with the metal fabricators and eventually decided that I needed to do what they were doing.
I signed up for a welding class at Brookline Adult & Community Education, taught at Brookline High School by the school's Industrial Arts instructor.
At the first class, there were seven students. 
I was the only female.
The instructor asked us to introduce ourselves and explain why we were taking the class.  I was the last one to do an introduction after listening to six explanations that involved classic car bumpers or motorcycle exhaust systems.
When I said, "I want to make garden ornament.", my fellow classmates shared looks with each other that suggested they were all thinking, "Who let the broad in the room?!"
I continued to go to class, but admitted to myself that this was not the right fit for me.
A better fit appeared when several projects in our office required handcrafted gate hardware, and a local blacksmith brought samples of his work to present to the project teams.
Everyone loved him and loved his work, and he was contracted to fabricate the hardware.
As he was leaving, I impulsively asked if he ever gave lessons and then described my previous attempt to infiltrate the male dominated adult-ed welding class.
He sometimes took on students, and agreed to let me take a series of lessons at the forge which he had built on his property.
This is not his forge.  The forge that he built was much more rustic and had an enchanting quality as did his family's property.
During my lessons, he told me the story of how he and his wife met when they were both Physics majors at MIT.  As a student, he already owned property in a suburb west of Cambridge and spent his weekends there clearing the land and building a house.  "I started at one corner and continued from there."
A girl in one of his classes asked why he was never around campus on the weekends.  She didn't believe him when he told her that he was building a house, so he drove her out the next weekend and she ended up working on the stone fireplace.
Several times, the stones she had set needed to be removed because they were not quite level. 
After many weekends, the fireplace was finally completed and she said, "Well...I think I have to marry you so that I can live with my fireplace."
By the time I started my lessons, they had been married for decades, had grown children and seemed to be completely delighted with the life that they had built together.
I loved being in their presence and I loved my lessons.
The first thing I made was this hook, similar to one that would have been made during colonial times.
As I worked on heating and hammering the iron, I would get a physics lesson that explained what happened to the metal as it was heated and work hardened.
One of my more ambitious projects was this gate handle.
I have yet to build the gate, so the handle stays tucked away waiting to be put to use.
Look closely and you can see the 'C' that I stamped in the lower triangle of the handle.

Wednesday, July 18, 2012

Copper Fold Forming

I love books.
I especially love books that teach me something new about designing and fabricating jewelry.
Go to any bookstore (if you're lucky to still have one nearby) or search online, and you will find a plethora of really wonderful jewelry books that provide technical and design guidance.  Many of them have helped me to develop my skills and to narrow my areas of interest.
I've been making jewelry and buying jewelry-themed books long enough that it's become challenging for me to find new books that provide me with the kind of inspiration that I'm searching for.
But......I found that inspiration in 'Foldforming' by Charles Lewton-Brain.
I've actually had this book for a while, and I frequently pull it out for some late night reading.
If you like working with and manipulating metal, I strongly recommend it.
After months of mulling over the techniques and the beautiful images, I decided to put information into action.
I cut a 6 1/2" x 1 1/2" strip of 22 gauge copper, filed and sanded all edges before annealing with an acetylene torch.
I then made a series of folds, some using a vise-grip and some just using the hammer on a steel bench block.
Between each step of folding, I annealed and quenched.
When I started, I had an idea of where I wanted to go.
That is not where I ended up.
I found that with my central fold that runs the length of the copper, I could not open it all of the way up, even after annealing.
The solution?.....I told myself to embrace the problem.
I laid the copper on a bench block and hammered away.
Once that lateral fold was flattened, I added 3 vertical folds.
After the final annealing and quenching, I again filed and sanded all edges before shaping the strip into a cuff with a steel bracelet mandrel.
How fun and satisfying to be able to make this with a strip of copper, a minimal amount of tools and brute force.

Monday, July 16, 2012

A Brass Surprise

I stopped by one of the local thrift stores a few weeks ago and spotted this brass dish tucked away on a shelf.
I thought that the colors were wonderful and initially believed it to be enamel, but a closer inspection helped me realize that the color was most likely some type of paint and that it was flaking off in many, critical areas.
 I debated leaving it on the shelf, but then decided the dish would probably be well worth the $3.00 investment.
 Using my jeweler's saw, I cut out a segment of the pattern.
I then used a brass brush to get rid of most of the flaking paint, and followed up with more cleaning with a sanding block
How lovely is that?!!
I have no idea how I might use this and the other sections that I'll be able to salvage from the dish, but I think it will be fun figuring out those projects.

Monday, July 9, 2012

Enough Practice Already!

I have been practicing and, in theory, improving my soldering skills by making bezels for different stones that I've purchased at local bead and jewelry supply shows.
Last night I took inventory of my finished bezel stash and decided it's about time that I actually made some completed pieces with these bezeled stones.

Thursday, July 5, 2012

Going Global

I love coins from around the world.
Some are so richly detailed which greatly enhances the exotic allure.
I have friends who travel the world, usually in pursuit of a total eclipse, and they often save their end-of-the-trip loose change for me.
A metal box in my studio is filled with coins from Mongolia, Australia, Singapore and other places that I fantasize about visiting some day.
Occasionally, I pull out that metal box of global coins to see what kind of inspiration might hit me.
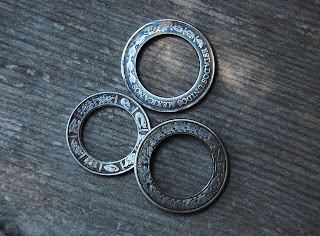
Some of the coins from Mexico are high on my list of favorites.
The patterning is beautifully intricate, and I love how there are two metals.
 I realized that if I set one of these coins on my dapping block, a swift hit with my hammer can knock out the central disc.
These outer rings are perfect for toggles, and I was getting ready to drill them for making connections when I thought that I could maybe take advantage of the patterning before making toggles.
I cut out a disc of copper, annealed it, set it on top of the outer ring of the coin and hammered away.  I used the ball peen end of my hammer when hitting the central part of the disc.
When I examined my results, I was underwhelmed. 
I realized that the depth of the coin was not enough to give me a smooth curve on the central dome that the ball peen was creating.  The center of the resulting dome ended up hitting the surface of my steel bench block and became flattened and marred.
I knew I could do better, and pulled my dapping block out again and this time, centered a copper disc and a coin ring over one of the forms. 
After hammering the perimeter, I used a dapping punch to try again for a nice and smooth domed surface.
Much better.
I now have smooth domes with beautifully textured collars.
These could become earrings, or links in a bracelet, or featured dangles in a necklace, or.......