Friday, January 29, 2010

Poetic License

I really like license plates. When driving, I always pay attention to the license plates of the cars in front of me especially when they are from another state. When my twins were younger, I came up with a couple of license plate games to help pass the travel time (come up with a correct math equation that uses all of the numbers was one). Expired license plates always capture my interest. They usually have a patina that suggests a well-traveled history filled with trips that tell stories of a family's life. I never throw out my old plates, and I look for others at flea markets and yard sales.

I recently cut up some old Pennsylvania plates that were given to me by a friend and decided to make a pin.

I saw cut the R keeping part of the flat portion as a border. I also cut out the center part of the R to create a window effect. All edges were filed and sanded.

I cut a piece of copper mimicing the R shape to make the back of the pin and stamped words starting with the letter R. I penciled some guidelines which I obviously did not follow too closely.

Front and back were riveted together after I attached part of a dictionary page to the back of my window.

The pin backing was also riveted in place before the front and back were attached. The copper was oxidized and then sanded to highlight the letters.
Whoops- I had not intended to show favoritism for RUMINATE.

Wednesday, January 20, 2010

Salt of the Earth

My one son is in the midst of his independent science project regarding endocrine disruptors in our waterways. In order to do testing of his samples he needed to find access to a gas spectrometer. Two members of the chemistry department at the fabulous college that is nearby are helping him (one helped him with developing the testing for last year's project on mycoremediation). These are the kind of people who are my heroes. People who take time in their busy lives to guide and inspire students. I am thrilled that my son is surrounded by mentors- these chemistry professors, the teachers in our school district and a variety of professionals who have offered thoughtful guidance.
I thought I would show thanks to these two wonderful chemists with earrings made especially for someone who is at home in a chemistry lab. 'NaCl' (sodium chloride- the chemical equation for salt) is stamped on one piece of brass and 'OF THE EARTH' is stamped on the other. The bottoms were textured with a center punch. Fresh water pearls dangle from one pair and carnelian beads from the other.
Mentors are the salt of the earth.
Thank you.

Monday, January 18, 2010

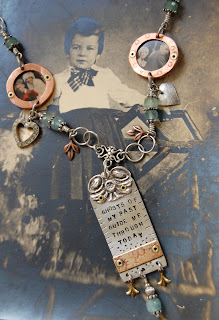
Ghosts of My Past

I made this necklace last year after finding a thrift store tin that was covered with vintage images. The tin was made to commemorate the 100 year anniversary of a family owned chocolate company, and the images helped to tell the history of both the family and the business. Recent years have found me dealing with significant losses in my life, and this necklace captures a sentiment regarding how people may leave our lives, but their impact remains.
'GHOSTS OF MY PAST GUIDE ME THROUGH TODAY' was stamped onto a sterling base which was textured with a chisel and a center punch. The bow at the top was saw cut from an old, damaged sterling buckle that my mother had given to me years ago. After filing and sanding the edges, I riveted the bow to the top of the sterling base. I wanted to create a balance of dimension and cut a piece of brass that I textured with the rolling mill. With the edges filed and sanded, I riveted the brass piece to the sterling base.
I cut discs of images from the tin and then created copper ring 'frames' that were hand forged from recycled wire. Texture was added with a punch and the ring was assembled with the image disc and a solid copper back. The three layers were riveted together. Holes were drilled for connecting to the sterling chain which is supplemented with wire wrapped aquamarine rondelles. Other adornments were randomly added- as with the sterling heart and the copper plated leaves shown here.

I loved this particular wedding image from the tin. The heart is sterling with rhinestones and was rescued from a thrift store find.
A bit about the photo that I used as the backdrop- I feel compelled to buy vintage photos when I find them at thrift stores or flea markets. Even though they document somebody else's family history, I don't like to see these photos as castaways and take them home with me. I love this young girl's look of serious confidence and thought my necklace would complement her nicely.

What a wonderful image of this young trombone band member! The copper ring framing him was textured with one of my favorite, old chisels.

The framed images are backed with discs cut from a piece of copper that I milled with some lace.

When I first made the necklace, I used a lobster clasp that had been purchased. I recently entered this necklace in a members show at a local art center. Because of the abundance of talent in the membership, I thought that the manufactured clasp would not be viewed favorably during judging. I made the clasp with 16 ga. sterling wire and am pleased witht he result. I guess the judge was also somewhat pleased- I got Honorable Mention.
Too bad that in the announcement posted at the gallery and on the center's web site that they noted me as Cynthia Finston.
Huh?!

Friday, January 8, 2010

Favorite Earrings

I made some earrings recently that I am especially pleased with. I took copper discs and drilled top/bottom holes for jump ring connections. I also drilled smaller, random holes for textural interest. The discs were domed in my dapping block and then sanded for a matte finish.
I then took a piece of the sterling lamp base shown in my previous 'Rolling Mill' post and cut it into segments. Top holes were drilled and each piece was slightly curved in a dapping block.

The pieces were joined with sterling jump rings and hang from sterling earwires. I like the contrast of the metals and the relative simplicity of the design. I like them so much that I have been wearing a pair of these earrings every day a couple of weeks. I am that way- if I find something I like, I stick with it! Just ask my one son who was recently heard saying, "Do we really have to eat sauteed vegetables EVERY night?!"

Tuesday, January 5, 2010

Be Present

This past summer I received an unexpected email from Christen Olivarez, the Managing Editor of Belle Armoire Jewelry.
 She had seen some of the jewelry images that I posted on my Flickr site and wanted to find out if I might be interested in submitting work to be considered for publication.
 YES!!
 I love no-brainers.
 I ended up sending 5 necklaces and writing a short piece about inspiration/process/blahblah and was pleased to find out that I would be a part of the Winter issue which came out at the beginning of December.
(pages 86-89)
I was initially asked to take photos illustrating the steps involved with fabricating one of my pieces. That part of my submission was not included in my article, so here it is:I found this and a matching pin at a favored thrift shop and bought them for 50 cents. They reminded me of my grade school days at Sacred Heart School in Bloomfield, New Jersey. I have lots of stories from those 5 years, but that's for another time.

Each pin had the pin finding soldered onto the back.

With gentle persuasion, I popped the pin finding off the back and filed the surface smooth.
I then drilled a small hole in the top which would allow me to later attach the pin with
a jump ring.
A very short segment of 3/4" diameter copper pipe was cut.

Edges were filed and sanded smooth.

The copper pipe segment was then soldered onto a piece of brass that I had prepared by cutting to size, rounding the corners with a file and sanding all edges smooth.

Two holes were drilled into the top for attaching to a chain. I then cut a piece of milled brass and a piece of etched sterling and drilled corresponding holes into each.

Holes were also drilled into the brass base, and the pieces of milled brass and etched sterling were attached with rivets. Three holes were drilled into the bottom of the base for attaching dangles.

"BE PRESENT" was stamped onto a 3/4" diameter brass disc. The edges were textured with an old chisel.

The stamped brass disc was set into the copper pipe bezel. Additional texture was added to the brass base by using a center punch. The sterling was oxidized and then lightly sanded to highlight the etched pattern.

Pieces of heavy gauge copper wire were cut, shaped and hammered to form links for connecting the pendant to chain.

Pieces of recycled copper wire were cut and balled on each end with the use of a plumbers propane torch. Dipping the balled wire into water immediately after removing from the flame results in a beautiful rosy color.

Pieces of the balled copper wire were wrapped around the heavy gauge links to add some interesting texture.

This is the final, assembled necklace.
 The pin as well as wire-wrapped carnelian beads were added at the base of the pendant with jump rings.
 Recycled chain is interrupted with wire-wrapped crystals and white agate faceted beads.
 The clasp was made by cutting out a large disc of milled copper, cutting out an offset smaller circle and then doming the piece in my dapping block.
 The other portion of the clasp was made with heavy gauge copper wire.