 This past summer I received an unexpected email from Christen Olivarez, the Managing Editor of Belle Armoire Jewelry.
She had seen some of the jewelry images that I posted on my Flickr site and wanted to find out if I might be interested in submitting work to be considered for publication.
YES!!
I love no-brainers.
I ended up sending 5 necklaces and writing a short piece about inspiration/process/blahblah and was pleased to find out that I would be a part of the Winter issue which came out at the beginning of December.
(pages 86-89)
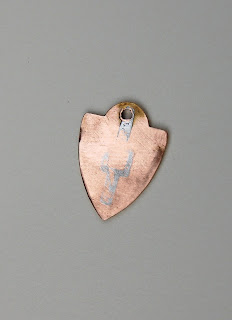
I was initially asked to take photos illustrating the steps involved with fabricating one of my pieces. That part of my submission was not included in my article, so here it is: I found this and a matching pin at a favored thrift shop and bought them for 50 cents. They reminded me of my grade school days at Sacred Heart School in Bloomfield, New Jersey. I have lots of stories from those 5 years, but that's for another time.
 Each pin had the pin finding soldered onto the back.
 With gentle persuasion, I popped the pin finding off the back and filed the surface smooth.
 A very short segment of 3/4" diameter copper pipe was cut.
 Edges were filed and sanded smooth.
 The copper pipe segment was then soldered onto a piece of brass that I had prepared by cutting to size, rounding the corners with a file and sanding all edges smooth.
 Two holes were drilled into the top for attaching to a chain. I then cut a piece of milled brass and a piece of etched sterling and drilled corresponding holes into each.
 Holes were also drilled into the brass base, and the pieces of milled brass and etched sterling were attached with rivets. Three holes were drilled into the bottom of the base for attaching dangles.
 "BE PRESENT" was stamped onto a 3/4" diameter brass disc. The edges were textured with an old chisel.
 The stamped brass disc was set into the copper pipe bezel. Additional texture was added to the brass base by using a center punch. The sterling was oxidized and then lightly sanded to highlight the etched pattern.
 Pieces of heavy gauge copper wire were cut, shaped and hammered to form links for connecting the pendant to chain.
 Pieces of recycled copper wire were cut and balled on each end with the use of a plumbers propane torch. Dipping the balled wire into water immediately after removing from the flame results in a beautiful rosy color.
 Pieces of the balled copper wire were wrapped around the heavy gauge links to add some interesting texture.
 This is the final, assembled necklace.
The pin as well as wire-wrapped carnelian beads were added at the base of the pendant with jump rings.
Recycled chain is interrupted with wire-wrapped crystals and white agate faceted beads.
The clasp was made by cutting out a large disc of milled copper, cutting out an offset smaller circle and then doming the piece in my dapping block.
The other portion of the clasp was made with heavy gauge copper wire.
 I found this and a matching pin at a favored thrift shop and bought them for 50 cents. They reminded me of my grade school days at Sacred Heart School in Bloomfield, New Jersey. I have lots of stories from those 5 years, but that's for another time.
 Each pin had the pin finding soldered onto the back.
 With gentle persuasion, I popped the pin finding off the back and filed the surface smooth.
I then drilled a small hole in the top which would allow me to later attach the pin with
a jump ring.
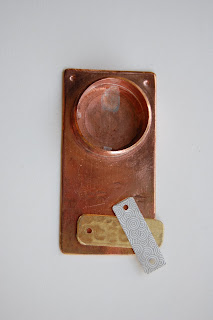
 A very short segment of 3/4" diameter copper pipe was cut.
 Edges were filed and sanded smooth.
 The copper pipe segment was then soldered onto a piece of brass that I had prepared by cutting to size, rounding the corners with a file and sanding all edges smooth.
 Two holes were drilled into the top for attaching to a chain. I then cut a piece of milled brass and a piece of etched sterling and drilled corresponding holes into each.
 Holes were also drilled into the brass base, and the pieces of milled brass and etched sterling were attached with rivets. Three holes were drilled into the bottom of the base for attaching dangles.
 "BE PRESENT" was stamped onto a 3/4" diameter brass disc. The edges were textured with an old chisel.
 The stamped brass disc was set into the copper pipe bezel. Additional texture was added to the brass base by using a center punch. The sterling was oxidized and then lightly sanded to highlight the etched pattern.
 Pieces of heavy gauge copper wire were cut, shaped and hammered to form links for connecting the pendant to chain.
 Pieces of recycled copper wire were cut and balled on each end with the use of a plumbers propane torch. Dipping the balled wire into water immediately after removing from the flame results in a beautiful rosy color.
 Pieces of the balled copper wire were wrapped around the heavy gauge links to add some interesting texture.
 This is the final, assembled necklace.
The pin as well as wire-wrapped carnelian beads were added at the base of the pendant with jump rings.
Recycled chain is interrupted with wire-wrapped crystals and white agate faceted beads.
The clasp was made by cutting out a large disc of milled copper, cutting out an offset smaller circle and then doming the piece in my dapping block.
The other portion of the clasp was made with heavy gauge copper wire.

Not long ago I received an email from her as well, but after several attempts to "connect" I never heard back... :^(
ReplyDeleteCongrats on being published, and thanks for sharing your step by step process!
Hi-
ReplyDeleteSorry, I just saw your comment. I am not used to the thought that someone might actually be reading my postings. My impression is that Christen is extremely busy with a variety of responsibilities. If she did express an interest and it is your hope to get published, I would definiltey encourage you to get back in contact with her at some point. Good luck!